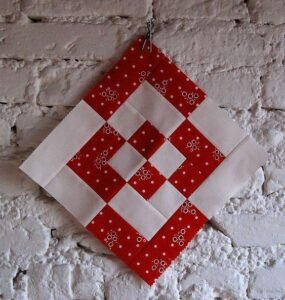
The Bento Box quilt pattern is a beautiful and versatile design that has captivated quilters of all skill levels. Named after the traditional Japanese bento box, which is a compartmentalized lunch box, this quilt pattern mimics the look of perfectly arranged blocks. The pattern is characterized by its geometric symmetry and the dynamic interplay of colors, making it a favorite among quilt enthusiasts.
Quilting is not only a craft but also an art form that allows for endless creativity and personalization. The Bento Box quilt pattern is an excellent choice for those looking to experiment with different color schemes and fabric combinations. Its structured layout makes it suitable for both beginners and advanced quilters, providing a rewarding challenge and stunning results.
In this tutorial, we will walk you through the step-by-step process of creating your very own Bento Box quilt. From selecting fabrics to cutting precise pieces and assembling the blocks, you’ll learn everything you need to know to create a quilt that you can be proud of. So, gather your materials, and let’s get started on this exciting quilting journey!
Materials Needed for Your Bento Box Quilt
Before you begin, it’s essential to gather all the necessary materials. Having everything ready will make the process smoother and more enjoyable. For this project, you’ll need a variety of quilting fabrics, a rotary cutter, a quilting ruler, and a cutting mat. Additionally, a sewing machine, thread, and basic sewing supplies such as pins and scissors are essential.
When selecting fabrics for your Bento Box quilt, consider using a mix of solid colors and prints. The pattern’s beauty shines through the contrast between different fabrics, so don’t be afraid to experiment with bold and vibrant combinations. Typically, you’ll need at least five different fabrics: one for the central square and four for the surrounding strips.
Ensure that your fabrics are pre-washed and ironed before you begin cutting. This step prevents any shrinkage or color bleeding later on. Also, make sure your rotary cutter blade is sharp to achieve clean and precise cuts. Now that you have all your materials ready, we can move on to the cutting process.
Cutting Your Fabric Pieces
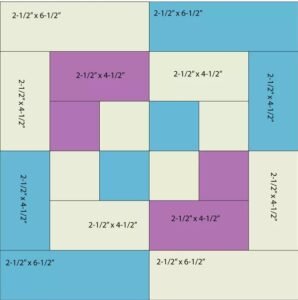
The key to a successful Bento Box quilt lies in precise cutting. You’ll be creating multiple blocks, each consisting of a central square surrounded by strips of fabric. Here’s a breakdown of the pieces you’ll need to cut:
- Central Square: Cut several 3.5-inch squares from your chosen fabric. The number of squares will depend on the size of your quilt.
- First Set of Strips: Cut 2-inch wide strips from two different fabrics. You’ll need these strips to surround the central square.
- Second Set of Strips: Cut 2.5-inch wide strips from two additional fabrics. These will form the outer frame of each block.
To begin, cut all your central squares. Next, cut the strips for the first and second sets. Organize your fabric pieces by grouping them into sets of one central square, two 2-inch strips, and two 2.5-inch strips. This organization will streamline the assembly process and help maintain consistency across all your blocks.
Precision is crucial, so take your time with this step. Use your quilting ruler and rotary cutter to ensure straight and accurate cuts. Once all your pieces are cut and organized, you’re ready to start assembling the blocks.
Assembling the Bento Box Blocks
Now comes the fun part – assembling the Bento Box blocks! Each block consists of a central square surrounded by two sets of fabric strips. Here’s a step-by-step guide to putting them together:
- Sew the First Set of Strips: Take a central square and sew a 2-inch strip to one side, right sides together. Press the seam open, then sew another 2-inch strip to the adjacent side of the square. Repeat this process for the remaining sides until the central square is framed by the first set of strips.
- Add the Second Set of Strips: Next, take a 2.5-inch strip and sew it to one side of the framed square. Press the seam open and continue sewing the remaining 2.5-inch strips to the other sides. This completes one block of your Bento Box quilt.
- Repeat the Process: Continue assembling blocks in the same manner until you have enough blocks to create your desired quilt size. Make sure to maintain a consistent seam allowance of 1/4 inch throughout the process for uniformity.
Once all your blocks are assembled, lay them out to determine the final arrangement of your quilt. Experiment with different layouts to find the most visually appealing design. This step allows you to balance the colors and patterns before sewing the blocks together.
Joining the Blocks and Completing the Quilt Top
After deciding on the layout of your blocks, it’s time to join them together to complete the quilt top. This stage requires careful alignment to ensure that the blocks fit together seamlessly. Here’s how to proceed:
- Sew Blocks into Rows: Begin by sewing the blocks together in rows. Align the edges carefully and use pins to keep the pieces in place. Sew the blocks with a 1/4 inch seam allowance and press the seams open or to one side as you go.
- Join the Rows: Once all the blocks are sewn into rows, start joining the rows together. Again, align the seams carefully and use pins to ensure everything stays in place. Sew the rows with a 1/4 inch seam allowance and press the seams open or to one side.
- Check for Alignment: After all the rows are joined, lay out the quilt top and check for alignment. Make any necessary adjustments to ensure that the seams and blocks line up perfectly. This attention to detail will give your quilt a polished and professional look.
With the quilt top complete, you’re ready to move on to the final stages of quilting and finishing. This involves layering the quilt top with batting and backing fabric, quilting the layers together, and adding binding to finish the edges.
Quilting and Finishing Your Bento Box Quilt
The quilting stage is where your Bento Box quilt truly comes to life. This process involves stitching the quilt top, batting, and backing fabric together. You can choose from a variety of quilting techniques, from simple straight-line quilting to more intricate free-motion designs. Here’s how to complete your quilt:
- Layering the Quilt: Start by laying out your backing fabric, right side down. Place the batting on top, followed by the quilt top, right side up. Smooth out any wrinkles and ensure all layers are aligned. Use safety pins or basting spray to secure the layers together.
- Quilting the Layers: Using your sewing machine, quilt the layers together following your chosen design. For beginners, straight-line quilting is a great option. Simply sew straight lines across the quilt, either vertically, horizontally, or diagonally. If you’re more experienced, try free-motion quilting to add a personal touch.
- Trimming and Binding: Once the quilting is complete, trim the excess batting and backing fabric. Then, prepare your binding by cutting strips of fabric, folding them in half lengthwise, and sewing them around the edges of the quilt. Binding gives your quilt a neat and finished look, and it’s also a great opportunity to add a pop of color.
After binding, your Bento Box quilt is complete! Give it a final press to remove any wrinkles and enjoy your beautiful creation. Whether you’re keeping it for yourself or gifting it to a loved one, your Bento Box quilt is sure to be cherished for years to come.
Tips for Personalizing Your Bento Box Quilt
One of the best aspects of quilting is the ability to personalize each project. The Bento Box quilt pattern offers plenty of opportunities to make it uniquely yours. Here are some tips for adding personal touches to your quilt:
- Fabric Choices: Experiment with different fabric types and colors. Mixing solids with prints or using a gradient of colors can create stunning effects. Consider using fabrics with special meaning, such as pieces from old clothes or themed prints that match the quilt’s intended use.
- Custom Quilting Designs: While straight-line quilting is classic and elegant, custom quilting designs can add an extra layer of personality. Try incorporating motifs that resonate with you, like flowers, stars, or abstract shapes. Free-motion quilting allows for endless creativity and can transform your quilt into a work of art.
- Embellishments: Don’t be afraid to add embellishments to your Bento Box quilt. Appliqué, embroidery, or even small buttons can enhance the design and make it truly unique. These additions can be used to highlight specific areas or add a whimsical touch.
By personalizing your Bento Box quilt, you’re not just creating a functional item but also a piece of art that reflects your style and creativity. The process of quilting is as rewarding as the final product, so take your time and enjoy every step of the journey.
Creating a Bento Box quilt is a fulfilling and enjoyable project that allows for immense creativity and personalization. This tutorial has provided you with a comprehensive guide to making your own Bento Box quilt, from selecting fabrics and cutting pieces to assembling blocks and finishing the quilt. With each step, you’ll develop your quilting skills and create a beautiful, unique piece.
Remember, the key to a stunning quilt lies in your attention to detail and willingness to experiment with different patterns and techniques. Don’t be afraid to make mistakes; each one is a learning opportunity that will improve your quilting. Whether you’re a beginner or an experienced quilter, the Bento Box quilt pattern offers a perfect blend of structure and flexibility.
Happy quilting, and may your Bento Box quilt bring warmth and joy to your home!


